Installing Tile On Wood Wall

Mur D Entrer Decoratif En Ceramique Effet Bois De Grange Vestibules Deco Maison Amenagement Maison

Bathroom Tub Surround Done With Wood Tile Turned Out Gorgeous Such A Unique Look Tile Tub Surround Wood Tile Shower Wood Tile Bathroom

When Installing Wood Grain Tiles Stagger Them Like Wood Planks Would Be Staggered Wood Tile Floors Flooring Wood Grain Tile

06 130 0101 Floor Tile Over Cbu On Wood Subfloor International Masonry Institute Flooring Plywood Flooring Tile Floor

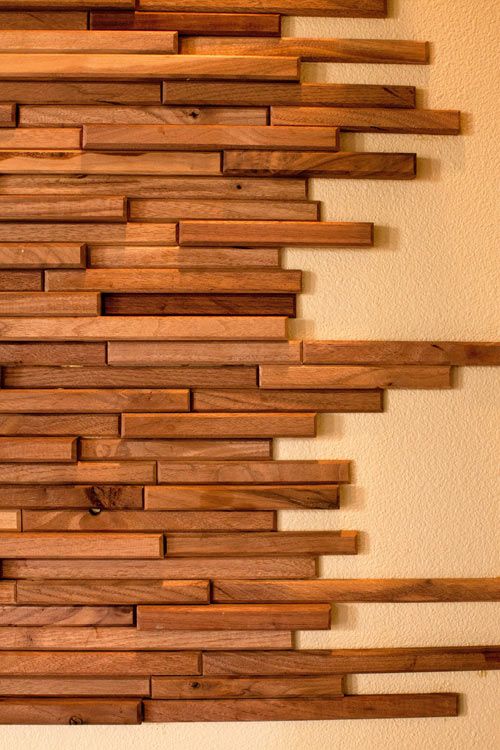
Products E S Wood Tile Garden State Tile Wood Tile Wall Planks Wood Backsplash

Ceramic Tile For Shower Walls Google Search Wood Tile Shower Wood Tile Bathroom Porcelain Wood Tile

Place the mosaic sheets along the wall.
Installing tile on wood wall.

Tile Flooring Demo Installation Centsational Style Plank Tile Flooring House Flooring Flooring

Tiling A Heat Shield Wood Burning Stove Corner Wood Stove Wall Wood Burning Stove

Ensuring The Perfect Wood Look Tile Installation Tal On Laying A Brick Or Running Bond Pattern When Lay Porcelain Wood Tile Wood Look Tile Tile Installation

Highlight Your Space With An Eye Catching Focal Wall Use Wood Look Tile In A Chevron Pattern For Added Interest Wood Look Tile Floor Decor Flooring

Wood Look Tiles Wood Tile Shower Wood Look Tile Wood Tile Bathroom

Create A Focal Point In Your Bathroom Shower With This Rich Real Wood Tile Every Installation Of This Wood T Shower Tile Wood Tile Shower Shower Tile Designs
Wood Tiles By Everitt Schilling Wood Wall Tiles Wood Tile Wood Accent Wall

Typically People Want A Random Offset To Mimic A Wood Floor Installation With A Random Offset You V Wood Look Tile Porcelain Wood Tile Wood Floor Installation

Lynn Mcdermott From Master Tile And Design Explains Why He Buys From Tile Outlets Of America Wood Plank Tile Design Wood Tile Floors

Managing Lippage Why Offsets Matter When Installing Tile Faux Wood Tiles Wood Wall Tiles Wood Tile Pattern

How To Create And Install A Diy Reclaimed Wood Accent Wall In 2020 Reclaimed Wood Accent Wall Wood Accent Wall Reclaimed Wood Wall

Redecorate Your Place Install Tiled Bathrooms And Showers Darbylanefurniture Com In 2020 Farmhouse Shower Rustic Bathrooms Wood Tile Shower

Installing Floating Vinyl Plank Flooring Over Ceramic Wall Tiles For Small And Narrow Bathroom Spaces Apartment Decorating Rental Rental Bathroom Diy Bathroom

Porcelain Stoneware Wall Floor Tiles With Wood Effect Larix By Ariana Ceramica Italiana Interiors Bathroom Jux Wall And Floor Tiles Wood Tile Floor Design

Ceramic Tile That Looks Like Wood Perfect For A Kitchen Bathroom Or Basement The Beauty Of Wood With The Ease Of Ceramic Wood Look Tile Flooring Home Diy

Barrique 8 X 40 Floor Wall Tile In Fonce Porcelain

Wood Look Tile Combines The Natural Warmth Of Wood With The Durability And Easy Care Of Porcelain That Makes It A Grea Wood Look Tile Home Remodeling Flooring

Square Wood Panels From Teak Your Wall Architonic Wood Wooden Wall Panels Wall Cladding
Https Encrypted Tbn0 Gstatic Com Images Q Tbn 3aand9gcsoze8ul9rgzhpc71461etoenp57alamoyowg Udww6f 6yt9hr Usqp Cau

Different Ways To Lay Wood Effect Tiles School Of Tile Wood Look Tile Flooring Ceramic Floor

Access Denied Porcelain Flooring Wood Look Tile Wood Grain Tile

All Flooring Install Photos Ceramic Floor Tile Wood Tile Floors Ceramic Wood Floors

8 Tips For Nailing The Wood Tile Look Little Green Notebook When You Re Choosing A Grout Color Find The Darke Wood Like Tile Wood Tile Porcelain Wood Tile

Brookwood Natural Dimensional Hardwood Mosaic Wall Tile Hardwood Wall Panel Wood Panel Walls Wood Wall Tiles
Source : pinterest.com
